Methi Paratha | Thepla: Roasted Fenugreek Flatbreads
- Away in the Kitchen

- Apr 3, 2021
- 9 min read
Updated: Dec 12, 2021
India has a variety of flatbreads in its culinary repertoire. Popular as meals-on-the-go as well as paired with main courses, flatbreads made of fenugreek leaves and flour are utterly delicious and a wonder tablet for health!

My mother always felt I have half a Punjabi inside me. Why? Although born and brought up in an Odia family, where rice, vegetables and fish dominate meals, my eyes always lit up at the mention of the quintessential Punjabi style parathas or rajma-chawal (rice with kidney beans gravy).
Sometimes, I feel that it was destiny that I landed up as a tenant at a Punjabi lady's house, Auntie A. If you have known me here, you know how I often mention her in my posts, elaborating the nitty gritty of cooking that I learned from her. Needless to say, my first paratha making lessons were from her and my parathas naturally have a Punjabi influence.
There's something extremely satisfying about parathas, even when they have nothing but salt and carom seeds in the dough. And, when something so delightful as fenugreek leaves are added, an extra layer of flakiness is created.
Food author and historian, K.T Achaya in his book, 'A Historical Dictionary of Indian Food' has described paratha as "Wheat dough rolled out, with frequent folding over while smearing with fat, to a square or triangular shape, and pan fried using a little fat to a layered structure. Cauliflowers, potatoes, spinach and fenugreek or methi leaves can be mixed into dough before frying." In its simplest form, a paratha is what Achaya says. If I were to explain it to someone who has never known it, I'd say paratha is an unleavened flatbread that's slightly roasted on a hot griddle with some fat unlike the chapati or roti, another Indian flatbread which does not necessarily require fat to roast it. Many people love to add ghee onto a roti once its taken off the griddle though.
The earliest references to parathas have been found in Nijjar's book, Punjab under the Sultans, 1000-1526 A.D. where he writes that parathas were common with the nobility and aristocracy of Punjab.Although parathas are typically associated with the northern states of India, chiefly Punjab, they are an integral part of many regional cuisines.
In fact, the Chalukya king Somesvara III is known to have written a book, Manasollasa, meaning that which delights the mind, where a section is devoted to the culinary arts. He mentions purana, a flatbread made wof wheat flour and stuffed with jaggery and gram flour paste, a precursor to the modern day obbattu or holige of Karnataka and puran poli of Maharashtra. Both are parathas in their own right.
When people, especially from outside India, think of paratha, they imagine it as a stuffed flatbread. But, parathas are not always stuffed with fillings.
Methi Paratha is not a stuffed paratha...
The dough for the paratha can be simple, consisting of only flour kneaded with salt and water or stuffed with vegetables, dals, meat or cheese. While making the dough, you can also add green leafy vegetables like chopped spinach, fenugreek leaves or pureed vegetables like beets, peas or greens along with some spices. In this process, the vegetables are a part of the dough. If you have leftover dal, you can also add that into the flour while kneading the dough.
For vegetables like cauliflower, radish or carrots, it's more common to grate them while for vegetables like potatoes are boiled and mashed, and then mixed with spices. Dals can also be boiled and smeared with spices. While rolling the dough, the grated or boiled vegetables, or boiled dal and even meat or cheese are added on the rolled dough, the dough is closed again and rolled out once more. This results in a layer of stuffing between two layers of the dough.
Methi parathas made with fenugreek or methi leaves incorporate the first method where you clean and wash the leaves, chop them and add them to the flour while kneading to create the dough.

Gujarati methi thepla
The Gujaratis (people who are from the state of Gujarat) in India are renowned for theplas, thin flatbreads. These are thinner than a standard paratha and much softer owing to the addition of yogurt or oil and sometimes gram flour in the dough. With a good kneading with oil, theplas store very well and are preferred for travel food, tiffin.
With the addition of fenugreek leaves, theplas attain a beautiful aroma. The bitterness of fenugreek compliments the spices like chili and turmeric. Accompanied with some freshly made chai, these are perfect for breakfast and snacks! Although I like them in any meal!
How do you decide: Not-stuffed or stuffed?
Here are some tips to help you decide:
If you want a lighter paratha and prefer to pair it with a chutney or a hot cuppa or a simple stir fry or dal, a plain paratha can be your choice! It's simple and easy to make!
If you want a single paratha meal and don't want to bother about sides, a stuffed paratha solves your problems. It's more filling but takes a bit of more effort.
If you want vegetables like cauliflowers, radish, potatoes, carrots or beets or any kind of meat or cheese, it'll be hard to knead them with the flour. Vegetables loose a lot of water on their own and will make the dough sticky and difficult to handle. Additionally, it will be much harder to roll this dough!
Green leafy vegetables like spinach and fenugreek leaves can be chopped fine and directly kneaded with the dough. You can also make puree of spinach leaves or boiled peas and knead that with the flour. The leaves become assimilated in the dough which is easy to roll and handle.
When is it best to eat these parathas?
Fenugreek is one of the oldest known medicinal plants to humankind and extremely beneficial for health. They're high in fiber and usually considered to provide warmth to the body (as per Ayurveda it stokes the fire element), and so best to consume during colder months: autumn to spring.
If you live in a place where summers are cool, you can still enjoy methi parathas in moderation during the season.
My memories...
I grew up in an Odia family who relocated every two years through eastern and central India, and thanks to mother's adaptive cooking, my taste buds enjoyed the enhanced flavors from all over India, and not native Odisha alone.
Nevertheless, parathas were never a staple in our family, though I always had a soft corner for that plain salted paratha mother served with siwayan kheer, ghanto tarkari (Odiya mix vegetable curry with sprouts) or aloo bhaja!

So, when Auntie A became my cooking guru, I grabbed the opportunity to season my skills in making all kinds of parathas, stuffed and plain alike! The smell of freshly made parathas in the morning, roasting slowly over a hot griddle can light up my day any time of the year. Though these are best in the winter.
The process...
Making methi parathas entails the following steps:
Cleaning: First, separate fenugreek leaves from the stems. Keep a tiny portion of the stem intact and break the leaves off from the main stem. This is the most time consuming part in the process. I prefer to play some music, choose a wide working table and sip some chai while I sort the leaves. Involve family members or friends! Next, wash and drain the leaves and keep aside, and later chop fine. Note: You can choose to store a portion of the leaves before washing and use them later to make methi aloo or methi chicken!


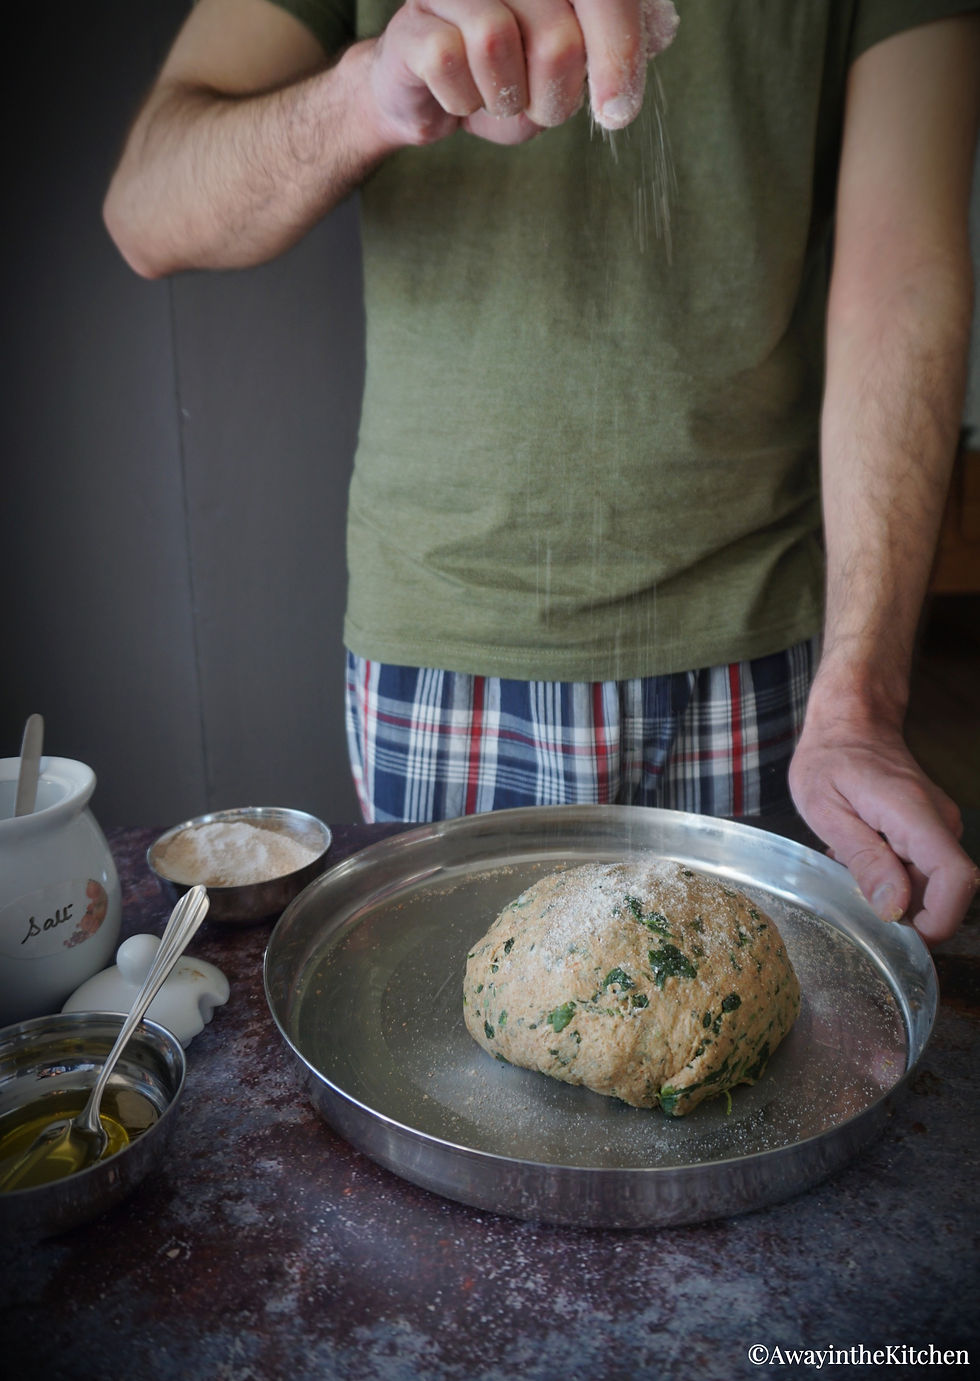
Mixing: You begin with adding the flours, salt and spices in a mixing bowl and use clean hands to loosely combine everything. Next, add the clean drain leaves and mix again. Most of the flour will stick to the flour. Use your fingers to combine all ingredients well. The aim is to form a pulpy ball of flour and leaves and clean the bowl of any remaining flour.
Kneading and resting: At this stage, add small amounts of fat (oil/yogurt) and some water to knead the dough. Now gently pat the dough and apply mild pressure on the dough with the heal of your hand (the portion where your palm ends and wrist begins), stretch it and fold it back. Continue this process until the dough is a smooth and soft ball. You may sprinkle some plain flour if you find the dough too sticky.
Once the dough is ready, cover and let it rest.
Rolling the dough: After about 20 minutes, make small balls out of the dough and keep aside. On a rolling board, dust some flour and then place the ball on it. Using a rolling pin, slightly press it to make it flat and roll on all sides to form a circular disc. You will need to sprinkle more flour as needed to enable the movement of the disc under the rolling pin.
Cooking: A paratha cooks best on medium to high heat. Begin by heating the griddle or tawa on medium heat for 5-7 minutes. Once hot, place the rolled paratha disc on the griddle and let the side underneath get roasted. You will notice the colour of the disc changing on the top surface and air pockets beginning to form. That's the time you flip the paratha using a spatula or tongs. Now smear oil on the surface facing up and let the other side get roasted. Flip again and smear oil on the other roasted side now. Gently press the sides, toss or flip once more before removing off the heat.


Pro Tip
To make methi parathas, ensure that you don't make the dough too tight. Add sufficient oil (I use olive oil) to knead the dough. I sometimes add yogurt, if I don't intend to store them for long. For a vegan substitute, use almond or oat milk. Even if you don't use yogurt or milk, your theplas/parathas will turn really good if you use the right amount of oil.
I use whole wheat flour along with chickpea flour, pearl millet and sorghum flour for this recipe, but you can use only wheat as well. Addition of chickpea or gram flour makes the dough softer and provides a slightly nutty flavour as well as adds the protein quotient. With fenugreek leaves added, micro nutrients are dealt with and the paratha becomes wholesome!
To make it gluten free, you may opt out wheat flour. It will need some care to handle the dough.
Do not skip the spices for the methi thepla or paratha dough! The spices provide the much needed flavour and balance the bitterness of fenugreek leaves.

Recipe
Ingredients1 cup of fenugreek leaves
1 cup whole wheat flour, 1/4 cup chickpea flour or gram flour (besan), 1/4 cup pearl millet or bajra flour, 1/4 cup sorghum or jowar flour or 1 and 1/4 cup whole wheat flour plus 1/4 cup besan
1 clove of garlic, crushed (optional)
1 tsp sesame seeds (optional)
1 and 1/4 tsp turmeric
1 and 1/2 tsp red chili powder
1/2 tsp coriander powder
1 and 1/2 tsp salt
4-5 tbsp yogurt or plant based milk (or more if required) for kneading or 1/3 cup of water or less (or more if required)
2-3 tbsp oil (I use extra virgin olive oil) + extra to cook
Note: This will make 10-11 parathas/theplas. Adjust the quantities for lesser numbers or make the dough and store in fridge to make the parathas as needed. The dough will last fresh 2 days in the fridge.
Method:Thoroughly rinse the fenugreek/methi leaves, drain and chop roughly.
In a large mixing bowl, first add all the flours. Then add the leaves, all the spices and salt with the flours. Use clean hands to mix well.
Add oil and bring everything together.
Start adding yogurt/milk to knead the dough. Use only a tbsp at a time. If using only water, use very little water to knead. Fenugreek leaves release water. So be judicious in how much water you add.
Knead well to form a smooth dough. Cover and let it rest for 15-20 minutes.
Make lemon sized balls from the dough.
On a rolling board/surface, place a dough ball, sprinkle some flour and using a rolling pin, start rolling it gently to form round discs of 5-6 inches diameter. Dust more flour as needed while rolling. You can roll all the parathas at once and cook them one by one or roll and cook and again roll and cook the remaining dough balls. Note: If you wish to roll and cook side by side, ensure you start heating the griddle or tawa when you're rolling the parathas.
To cook the paratha, place the rolled disc on a hot griddle. Once it's partially cooked - indicated by rising air pockets and change in color of the paratha, flip it using a spatula.
Spread oil on this side and let it cook. Once cooked, flip it again and spread oil on this side. Press the paratha gently with the spatula and once you see golden brownish spots, flip it again. Press again, flip once more if needed and remove from the griddle.
Store in a covered place or serve warm! Repeat steps 8 and 9 to cook the rest of the parathas/theplas.


Comments